As a geologist, your polarizing microscope is more than a tool—it’s your window into the mineral world. But when the view goes dark, colors vanish, or the stage sticks mid-rotation, it can grind your identification work to a halt. The good news? Most polarizing microscope issues have simple fixes, whether you’re in a climate-controlled lab or out in the field. In this guide, we’ll break down how to use these microscopes for mineral ID and solve the most common problems geologists face. Let’s dive in.
What Is a Polarizing Microscope, and How Do Geologists Use Its Viewing Modes?
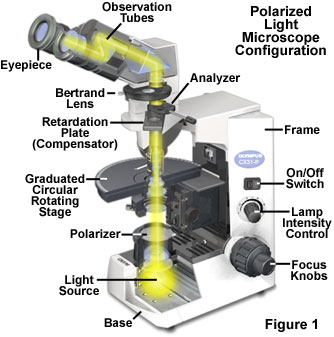

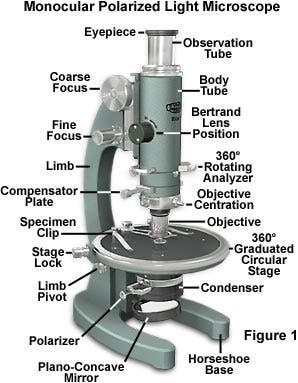
A polarizing microscope (or petrographic microscope) uses polarized light to reveal hidden optical properties of minerals—properties that plain light misses. Geologists rely on three key viewing modes to “read” minerals, and each has its own purpose (and common hiccups). Let’s break them down in plain terms:
1. Plane-Polarized Light (PPL): Check the Mineral’s “Appearance.”
In PPL mode, only one polarizer is active. This is where you study a mineral’s basic looks: color (or lack thereof), how “bumpy” it seems (called relief—think high vs. low凸起), cracks, and inclusions (tiny trapped materials). For example, quartz looks clear and “flat” (low relief) here, while olivine stands out with high relief and often has small cracks.
Key thing to watch for here: pleochroism (color change when you rotate the stage). Some minerals (like amphibole) shift color in PPL—this is a huge ID clue. If you’re not seeing color changes when you rotate, that’s often the first sign of a problem.
2. Crossed Polarized Light (XPL): Unlock the “Color Code.”
XPL mode uses two polarizers (one above the stage, one below) aligned perpendicular to each other. When no mineral is present, the field goes black. But minerals with birefringence (the ability to split light into two beams) create bright interference colors here—think of it as the mineral’s unique “fingerprint.”
Quartz shows pale gray-white (first-order) interference colors, while olivine pops with vibrant second-to-third-order hues. If your XPL view isn’t black when empty, or if colors are missing/chaotic, you’ve got a troubleshooting task on your hands.
3. Conoscopic Observation: The Ultimate ID Check
Conoscopic mode (using a condenser lens to focus light into a cone) is for advanced ID—it reveals details like optic sign (positive/negative) and optic angle, which help distinguish tricky mineral pairs. This mode is mostly used in labs, but knowing its basics helps diagnose lens alignment issues.
Why Polarizing Microscopes Are Non-Negotiable for Geologists
Polarizing microscopes aren’t just “fancy magnifiers”—they’re critical for three core tasks that make or break geological work:
- Determine optical properties: Things like birefringence, pleochroism, and extinction angle (the angle where the mineral goes dark in XPL) are unique to each mineral. Without these, you can’t tell quartz apart from feldspar.
- Distinguish similar-looking minerals: Calcite and dolomite look almost identical to the naked eye, but in XPL, calcite shows “pearly” high-order white interference colors, while dolomite’s colors are duller. A quick XPL check solves the mystery.
- Analyze rock(origin): The way minerals are arranged (e.g.size, orientation) and their optical properties tell you if a rock formed from magma (igneous), sediment (sedimentary), or heat/pressure (metamorphic). For example, aligned minerals in XPL mean the rock was metamorphosed.
5 Minerals Best Observed with a Polarizing Microscope (Lab + Field Tips)
Some minerals are practically made for polarizing microscope ID—here are the top 5, with their key features and common “red flags” (signs) to watch for:
| Mineral Name | PPL (Plane-Polarized Light) Features | XPL (Crossed Polarized Light) Features | Common “Troublesome” Signs (What to Check) |
| Quartz (Quartz) | Colorless, transparent, low relief (flat-looking), no pleochroism | No color change when rotating the stage (normal for quartz!), but if XPL view is never black: check polarizer alignment | No color change when rotating stage (normal for quartz!), but if XPL view is never black: check polarizer alignment |
| Olivine (Olivine) | First-order gray-white interference colors; extinction is parallel (goes dark when the stage is at 0°/90°) | Vibrant second-to-third-order interference colors (yellows, greens, blues) | Dull/gray colors instead of bright hues: likely a dirty lens or misaligned condenser |
| Calcite (Calcite) | Colorless to white, obvious relief changes (looks like it “pops in/out” when rotating), rhombic shape | High-order white interference colors (pearl-like sheen); shows “twinning” (striped patterns) | No pearlescent sheen: check if both polarizers are engaged (common field mistake!) |
| Feldspar (Feldspar) | Colorless to pale pink/white, low to moderate relief, often has cleavage (flat, parallel cracks) | First-order white to pale yellow interference colors; shows “albite twinning” (fine stripes) | Blurry cleavage lines: dirty slide or objective lens (wipe with lens paper!) |
| Amphibole (Amphibole) | Dark green to black, high relief, strong pleochroism (color shifts when rotating) | Second-order blue-green interference colors; inclined extinction (goes dark at an angle, not 0°/90°) | No pleochroism: stage rotation stuck or polarizer not working |
How Geologists Use Polarizing Microscopes (and Fix Common Faults)
Geologists follow a simple workflow for mineral ID: PPL first (for basic looks), then XPL (for interference colors), then conoscopic (if needed). But when the workflow breaks, it’s almost always one of these common faults. Below, we’ll break down fault types, causes, step-by-step fixes, and real geological cases—plus how to tell if it’s operator error or a broken tool.
Common Fault 1: No Interference Colors, Dark/Blurry Image
Possible Causes: Polarizers not aligned/engaged; condenser lens lowered; dirty objective/slide; low light intensity.
Step-by-Step Fix:
- Step 1: Check if both polarizers are on (most scopes have a toggle for the upper polarizer). Flip the upper polarizer switch—if the field goes black (no sample), they’re working.
- Step 2: Raise the condenser lens (it should be near the stage for XPL). Use the condenser adjustment knob to lift it until the field brightens.
- Step 3: Wipe the objective lens and slide with lens paper (never use tissue—they scratch!). If the slide is dirty, clean it with ethanol (lab) or a damp cloth (field).
- Step 4: Turn up the light intensity (on the base of the scope). In the field, make sure your portable light source is charged/aligned.
Geological Case: A field geologist was examining a metamorphic rock sample and couldn’t see interference colors. Turns out, the upper polarizer had flipped off during transport. A quick toggle fixed the issue, and they identified aligned amphiboles (confirming regional metamorphism).
Common Fault 2: Mineral Doesn’t Go Dark (No Extinction) in XPL
Possible Causes: Polarizers misaligned; stage not rotating freely; mineral is isotropic (e.g., garnet—these never go dark!)
Step-by-Step Fix:
- Step 1: Test with a known anisotropic mineral (e.g., quartz). If quartz doesn’t go dark, polarizers are misaligned.
- Step 2: Align the polarizers: Remove the sample, turn the lower polarizer until the field is black. Then rotate the upper polarizer until it’s also black (perpendicular to the lower one).
- Step 3: If the stage is stuck, gently wiggle the rotation knob—dust/grit (common in the field) often causes this. Wipe the stage edge with a dry cloth.
- Step 4: If not all minerals don’t go dark, you might have an isotropic mineral (like garnet)—that’s not a fault, it’s an ID clue!
Common Fault 3: XPL Field Isn’t Black (Even Without Sample)
Possible Causes: Polarizers not perpendicular; upper polarizer loose; lens misalignment.
Step-by-Step Fix:
- Step 1: Realign polarizers (follow Step 2 from Fault 2).
- Step 2: Tighten the upper polarizer (use the small set screw—don’t over-tighten!). Field work tip: Carry a small screwdriver in your kit for this.
- Step 3: If alignment doesn’t work, check for lens damage (scratches, cracks)—this is a hardware issue, not operator error.
Common Fault 4: Stage Sticks, Lens Switching Is Clunky
Possible Causes: Dust/rock particles in moving parts; lack of lubrication; physical damage from field transport.
Step-by-Step Fix:
- Step 1: Blow dust off the stage and lens turret with a bulb syringe (field-friendly!). Avoid compressed air—it can push dust deeper.
- Step 2: For sticky stages, apply a tiny drop of silicone lubricant (lab only—don’t use in field, as it attracts dust).
- Step 3: In the field, if lubricant isn’t available, wipe with a dry cloth and gently work the stage back and forth to loosen grit.
How to Tell: Operator Error vs. Equipment Fault?
This is the biggest question geologists ask! Here’s the quick test:
- Operator error: Issue fixes with simple steps (aligning polarizers, cleaning lenses, turning on lights). Happens after transport or switching users.
- Equipment fault: Issue persists after alignment/cleaning/lubrication. Signs include: cracked lenses, loose parts that won’t tighten, stage that’s permanently stuck, no light from the base (even with new bulbs/batteries).
Field vs. Lab Troubleshooting: Key Differences for Geologists
Troubleshooting in the field is all about speed and minimal tools—you don’t have a lab’s supplies. Here’s how to adapt:
| Aspect | Lab Troubleshooting | Field Troubleshooting |
| Tools Available | Lens cleaner, lubricants, screwdrivers, replacement bulbs, spare lenses | Bulb syringe, lens paper, small screwdriver, dry cloth, portable light source |
| Priority | Precise alignment and long-term equipment care | Quick fixes to get back to sampling; temporary solutions (e.g., wiping grit instead of lubricating) |
| Common Issues | Polarizer misalignment, dirty lenses, and worn lubrication | Dust/grit in stage, dead portable light, upper polarizer flipped off during transport |
| Fix Strategy | Thorough cleaning; proper lubrication; full alignment | Minimal cleaning; quick alignment; using natural light if portable light fails |
Final Thoughts
Your polarizing microscope is a workhorse—with a little know-how, most issues are fixable in minutes. The key is to start with the simplest fixes (cleaning, alignment) before assuming equipment damage. And remember: field and lab troubleshooting are different—adapt your tools and speed to the environment.
Pro Tip: Geologist’s Portable Microscope Maintenance Kit
Don’t get stuck in the field without these essentials (fits in your backpack!
Got a Unique Fault?
Leave a comment below describing the issue (e.g., “My XPL colors are spotty when viewing feldspar”) and the environment (lab/field). I’ll add solutions to this guide for the community!