
Have you ever looked at your polarizing microscope and not seen the polarization effects you need, wondering why? Or has at least one time blurred pictures made your observations fail? You are not the only one. Many users, whether beginners with polarizing microscopes or seasoned professionals, face the same challenges with these common pitfalls. The bright side is that most of the polarizing microscope errors are easy to mend once you know what to look for. In this guide, we’ll dissect the 7 most common polarizing microscope errors, tell you why they happen, and provide you with simple, step-by-step fixes to quickly get back to clear, correct observations. Besides, we have also added a helpful troubleshooting chart and pro tips so that you won’t be facing these issues again—these are great for anyone who needs polarizing microscope troubleshooting or for those who want to perfectly use a polarizing microscope.
How exactly does a Polarizing Microscope work to “see” things?

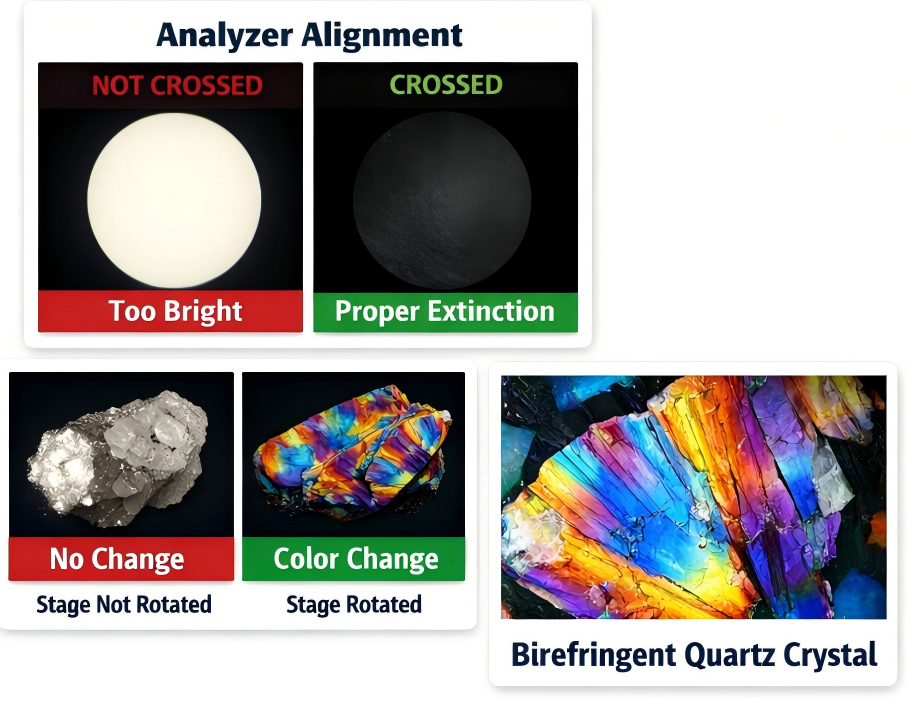
Firstly, let’s get the very basic things straight among all other issues—there is no need for a physics degree for this. A polarizing microscope consists of two main components, which are the polarizer (normally placed underneath the stage) and the analyzer (in most cases, positioned above the objective). Just to picture them, they are like two picket fences. The polarizer reduces the intensity of “light” passing through the fence by making all waves go through the slat of the picket aligned in that direction (like all light waves being arranged to pass through only one slat of the fence). The analyzer subsequently produces only the matching-direction waves as its own. When they are set up the same way (i.e., parallel), light passes through, and the viewing area is illuminated. When they are set at right angles (i.e., 90 degrees apart), then no light gets through—this scenario is known as “extinction,” and it is through this method that you observe polarization effects in samples such as minerals, crystals, or biological tissues.
So to put it simply, the main purpose is to show how your sample responds to polarized light—interference colors or extinction patterns are examples of such interaction. No,w let us discuss the common mistakes.
7 Common Mistakes When Using a Polarizing Microscope and How to Avoid Them
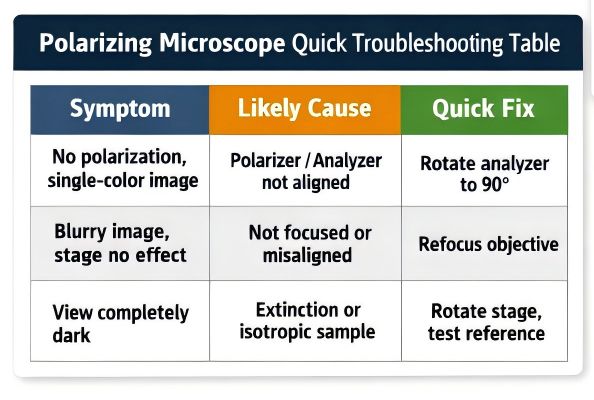
| Problem You See | Likely Mistake | 1-Minute Fix |
| Total black field of view | Polarizer/analyzer off or crossed + no sample interaction | Flip polarizer/analyzer switches to “on”; rotate analyzer slightly |
| No polarization effects (plain image) | Polarizers aligned (not crossed) | Clean the objective/stage; align the objective with the nosepiece marks; flatten the sample |
| Blurry/fuzzy image (even after focusing) | Objective not aligned or dirty; sample not flat | Clean the objective/stage; align the objective with the nosepiece marks; flatten the sample |
| Weird interference colors | Compensator misused; light intensity off | Insert/remove compensator as needed; adjust light intensity/diaphragm |
| No extinction positions | Polarizers not fully crossed; stage not level | Cross polarizers fully; adjust stage level screws; test with standard sample |
| Inconsistent results | Settings not recorded; sample moved | Jot down objective, light, and compensator settings; mark sample position |
Mistake 1: Total Black Field of View (No Light at All)
What you’ll see: The whole view will be completely black even if the light is at its highest setting. One may conclude that the microscope is defective; however, this is most likely just a misunderstanding.
Why it happens: The issue usually is the polarizer or analyzer being turned off (some models indeed have an on/off switch for both) or they’re crossed, and your sample is not interacting with polarized light (which is rare for standard samples). Newbies often forget to flip the switch for one of the polarizing parts-we’ve all been there!
How to fix it: First, do the easiest check-find the on/off switches on the polarizer (under the stage) and analyzer (near the eyepiece), and turn them to “on.” If that doesn’t bring any change, slowly rotate the analyzer (usually, it has a dial with degree marks) a little at a time. The field of view should get brighter as you move it away from the crossed position. If it’s still black, check again if the light source is on and the diaphragm is not completely closed.
Pro tip to avoid it: Make it a routine to always check the polarizer/analyzer switches first, whenever you are setting up the microscope. If you are new to this, keep a small sticky note on the side with “Check Polarizers!” written on it-reminders are fine!
Mistake 2: No Polarization Effects (Just a Blurry or Plain Image)
What you’ll see: The field of view is bright, but your sample looks like it would under a regular microscope—no interference colors, no extinction when you rotate the stage. You’re not getting any of the polarization data you need.
Why it happens: This is almost always because the polarizer and analyzer are aligned (parallel) instead of crossed. Remember the fence analogy? If both fences are lined up, light passes straight through, and you don’t see any polarization effects. Sometimes this happens if someone adjusted the analyzer before you and forgot to reset it.
How to fix it: Grab the analyzer’s rotation dial and slowly turn it 90 degrees (look for the 0° and 90° marks on the dial). As you turn, watch the sample—you should start to see interference colors or darken areas (extinction) as the polarizers cross. If you’re not sure, rotate the stage a little too—most birefringent samples (like crystals) will show extinction at certain stage angles when the polarizers are crossed.
Pro tip to avoid it: After setting up, always rotate the stage 360 degrees to check for extinction. If you don’t see any, stop and adjust the analyzer—this takes 2 seconds and saves tons of frustration.
Mistake 3: Blurry, Fuzzy Images (Even After Focusing)
What you’ll see: You turn the focus knob, but the image never gets clear. It might appear out of focus, have double lines, or look “smudged.” This is extremely irritating, particularly when you are trying to take clear notes.
Why it happens: The major reason here is that the objective lens is not aligned (referred to as “centered” or “coaxial”) with the light path. Or, your specimen is not flat on the stage—if the specimen is tilted or distorted, even a perfectly aligned microscope cannot focus it. Also, dirt on the objective or stage glass can cause the image to be fuzzy.
How to fix it: First, clean the objective lens using a lens wipe (be gentle! Don’t scratch it) and clean the stage glass. If that doesn’t work, examine your sample—make sure it is flat on the stage, not tilted or overlapping with the cover slip. Then, center the objective: most microscopes have centering screws on the nosepiece (where the objectives are attached). Look for a tiny mark on the objective line—align that with the mark on the nosepiece first. Then, focus on a small area of the sample, turn the objective a little, and tweak the centering screws until the image remains sharp as you turn the stage.
Pro tip to avoid it: Always clean the objective and stage before using them. When switching objectives, line up the marks on the objective and nosepiece—this will keep them aligned by default. For samples, use a flat cover slip and press gently to ensure it’s even.
Mistake 4: Weird, Unexpected Interference Colors
What you’ll see: The interference colors on your microscopic sample appear to have been totally wrong—simply too dim, too bright, or not the expected colors (for example, you usually see blue but get red). This situation can distort your analysis of the sample.
Why it happens: The major factor contributing to this phenomenon is that the compensator (the minor accessory that increases the interference colors) is either placed where it should not be or is not placed where it should be. Also, the light intensity might be too high or too low—bright light can wash out even subtle colors, whereas dim light makes colors hard to tell apart.
How to fix it: Start by checking the slot for the compensator (which is usually located near the objective). If there is a compensator in the slot that is not needed, then take it out. If it is required (for certain types of samples such as minerals), then make sure it is correctly inserted (it should click into place). After this, adjust the light intensity—lower it a bit if the colors are washed out, or increase it if they are too dim. You can also change the diaphragm in order to make the colors more defined (the diaphragm is the disk that light passes through and which controls the light intensity).
Pro tip to avoid it: Make compensators and assign them to specific samples. Having a cheat sheet like “No compensator for basic observations, red plate for mineral analysis,” etc., can be very beneficial. Always start with medium light intensity, as this gives you the possibility to adjust accordingly.
Mistake 5: Damaging Samples (Or Scratching Lenses)
What you’ll see: Your specimen shows signs of wear, such as scratches, smudges, or a melted appearance. Additionally, you might discover scratches on the objective lens, which turns out to be (a costly mistake!).
Why it happens: This often occurs when the objective lens comes in contact with the specimen or cover glass. Beginners frequently drop the objective too deeply while trying to see more clearly, and they do not realize how near it is. Working with corrosive or viscous samples and not using a protective coverslip leads to damage to both the samples and the lenses.
How to fix it: There is no remedy for a scratched sample; it is better to discard and start with a new sample. For cleaning lenses, employ lens cleaner (not ordinary alcohol!) along with a soft lens cloth to softly wipe off any dirt. If the scratch is too deep, professional repair or replacement of the lens might be required. To avoid accidents, always focus by moving the objective away from the sample, and thus you will not inadvertently push it into the sample.
Pro tip to avoid it: Utilizing the coarse focus knob, lower the stage (or raise the objective) until you are at a distance from the sample, then gradually bring up the stage (or lower the objective) while viewing through the eyepiece. Cease as soon as the image begins to come into focus, then switch to the fine focus knob. It is a must to always use a coverslip for corrosive or sticky samples—consider it as a protective barrier for both your sample and lenses.
Mistake 6: Can’t Find Extinction Positions (Critical for Sample Analysis)
What you’ll see: Every time you turn the stage, your sample is never completely dark (extinction). If you are analyzing crystal orientation or mineral properties, it is a crucial data point—extinction, a big problem that you have made.
Why it happens: Most probably, the polarizers are not fully crossed (as we discussed earlier!) or the stage is not even. If the stage is inclined, the sample is not lying in the right plane for extinction. Is there another reason? Your sample is not birefringent (which means it does not interact with the polarized light) but that is a rare case with the samples used with polarizing microscopes.
How to fix it: First of all, do a double-check on the polarizers—rotate the analyzer until the field of view is as dark as it can be (without the sample). Now, place the sample back and rotate the stage again. If you still do not see extinction, check the stage level—there are level screws on the base of most microscopes. Adjust them until the stage is flat (using a small level tool can be very helpful). If nothing works, consider a different sample (one you are sure is birefringent, such as a piece of calcite) to eliminate the possibility that the issue is with your sample.
Pro tip to avoid it: Before every session, carry out a microscope test with a “standard” sample (like a calcite chip) that you know definitely displays extinction. This verifies that the polarizers are crossed and the stage is level so you won’t have to spend time troubleshooting with your actual sample.
Mistake 7: Inconsistent Results (Different Observations Every Time)
What you’ll see: You take a measurement or note an observation, but when you repeat it later (or with the same sample), the results are different. This is frustrating if you’re doing research or quality control.
Why it happens: You’re not recording your settings! If you change the objective, light intensity, compensator position, or polarizer angle between observations, your results will vary. Also, moving the sample (even a little) can change what you see.
How to fix it: Start a simple log for each observation. Write down: objective magnification, light intensity, whether a compensator is used, and the angle of the analyzer/stage. Use a marker to make a small dot on the stage and sample (gently!) to keep the sample in the same position. If you’re using digital software, save the image with the settings in the file name (e.g., “Calcite_10x_CompensatorOn.jpg”).
Pro tip to avoid it: Keep a small notebook next to the microscope (or use a notes app on your phone) to jot down settings. It takes 10 seconds and ensures your results are consistent—critical for EEAT (Experience, Expertise, Authoritativeness, Trustworthiness) in your work.
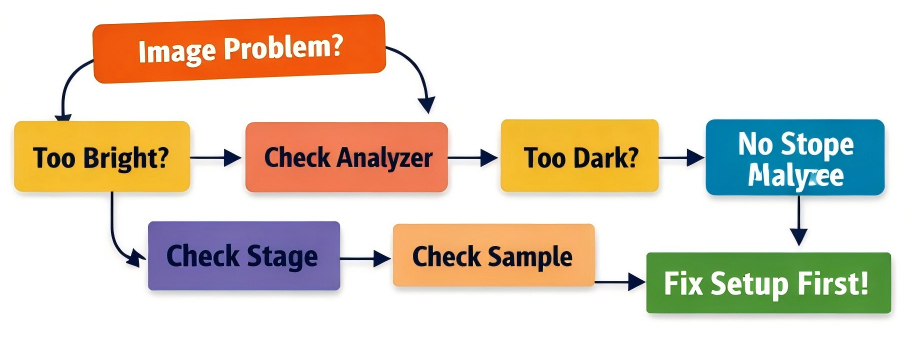
Quick Polarizing Microscope Fix Flowchart
In case you are stuck, bear in mind the following easy flow to pinpoint the trouble:
1. Black field of view? → Polarizer/analyzer switches → Rotate analyzer → Light source/diaphragm check
2. Bright image but no polarizing effects? → Cross polarizers (rotate analyzer 90°) → Test with standard sample
3. Blurry image? → Clean lenses/stage → Align objective → Flatten sample
4. Colors/extinction not right? → Compensator adjustment → Check stage level → Record settings
Final
To eliminate nearly all errors, remember the following saying: “One on, two align, three fix; clean first, place flat, then observe; note settings, mark positions, results persist.” This mantra serves as a very simple memory aid to the main steps: turning polarizers on, aligning them and the objective, fixing the sample position, cleaning first, observing, and recording settings.
Polarizing microscope use does not have to be an irritant; most problems are merely slight errors that can be fixed easily. By being aware of the 7 frequent blunders along with their respective solutions, you shall not only save time but also protect your equipment and have accurate results assured.

