Cannulation is a fundamental skill for nurses, enabling them to administer medications, fluids, and perform diagnostic tests efficiently. Despite its importance, many novice nurses find it challenging to master this skill due to the technical precision and patient-centered approach required. This article provides a comprehensive guide to help nurses progress from novice to expert in cannulation, offering practical insights, step-by-step instructions, and tips for continuous improvement.
Why Cannulation Training is Essential?
The ability to perform successful and safe cannulation is not merely a technical skill; it is a cornerstone of modern nursing practice that directly impacts patient well-being and the efficiency of healthcare delivery. Comprehensive training in this area equips nurses with the knowledge and dexterity to navigate the complexities of venous access effectively.
What is Cannulation?
At its core, peripheral IV cannulation involves the percutaneous insertion of a flexible, hollow tube (the cannula or catheter) into a peripheral vein. This establishes a direct pathway into the patient’s bloodstream, allowing for the administration of medications (antibiotics, analgesics, chemotherapy), fluids (crystalloids, colloids, blood products), and nutritional support. Furthermore, the cannula provides a route for obtaining blood samples for diagnostic testing, eliminating the need for repeated venipunctures. The primary purpose of cannulation is to provide reliable and repeated access to the venous system, facilitating efficient and minimally invasive patient care.
Key Structures and Common Sites for Cannulation
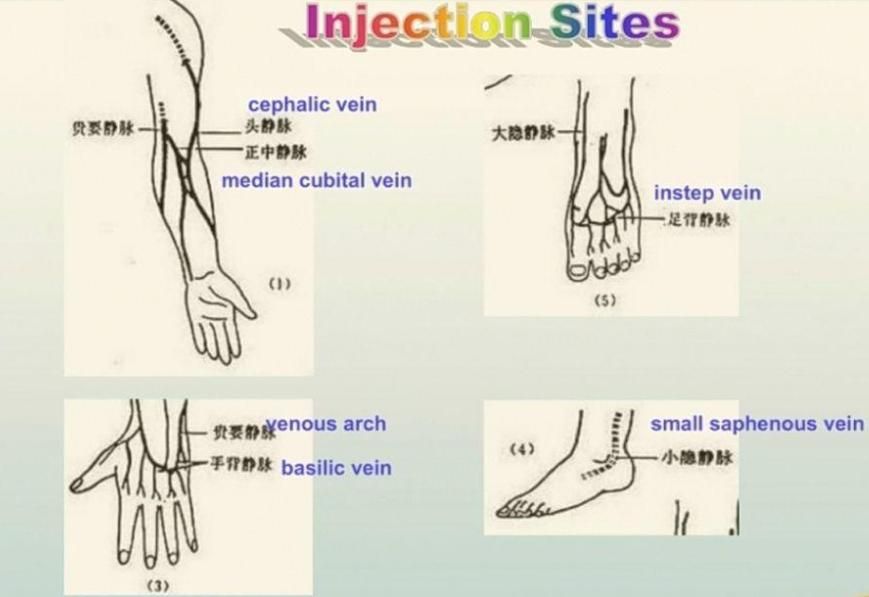
Successful cannulation hinges on a thorough understanding of the peripheral venous anatomy of the arm and hand, the most common insertion sites.
Key veins include the cephalic vein, often running along the lateral aspect of the forearm; the basilic vein, located on the medial aspect; and the median cubital vein, situated in the antecubital fossa (the bend of the elbow) and frequently the largest and easiest to access. Veins in the dorsal metacarpal network on the back of the hand and the forearm veins (radial and ulnar) are also utilized.
Understanding the course and depth of these veins, as well as avoiding underlying nerves and arteries, is crucial for safe insertion. For instance, palpating for a pulse near the intended insertion site helps rule out accidental arterial puncture.
Types of Cannulas and Their Applications
IV cannulas come in various gauges (measured using the French gauge system, where a larger number indicates a smaller diameter) and lengths, each designed for specific purposes.
- Smaller gauges (e.g., 22G, 24G) are typically used for administering routine medications and fluids in patients with small or fragile veins, such as pediatric or elderly individuals.
- Larger gauges (e.g., 18G, 20G) are preferred for rapid fluid resuscitation, blood transfusions, and the administration of viscous medications due to their higher flow rates. The choice of cannula depends on the patient’s condition, the type and rate of infusion required, and the size and condition of their veins. For example, in a trauma situation requiring rapid blood transfusion, an 18G or even a 16G cannula would be the preferred choice.
Common Indications and Contraindications for Cannulation:
Cannulation is indicated in a wide range of clinical scenarios, including the need for intravenous medication administration (e.g., antibiotics for infection, analgesics for pain management), fluid and electrolyte replacement (e.g., for dehydration), blood product transfusion (e.g., for anemia or hemorrhage), and nutritional support (e.g., total parenteral nutrition).
However, certain conditions may contraindicate cannulation at a specific site. These include signs of infection at the intended insertion site (cellulitis, phlebitis), significant edema in the limb, burns or skin breakdown over the site, previous injury or surgery affecting venous drainage, and the presence of an arteriovenous fistula or graft in the limb (typically in patients undergoing hemodialysis).
In conclusion, comprehensive cannulation training provides nurses with the foundational knowledge of anatomy, equipment, and clinical indications necessary for safe and effective practice. This understanding forms the bedrock upon which procedural skills are built, ultimately leading to improved patient care and reduced complications associated with IV therapy.
Preparing for Cannulation: Setting the Stage for Success
Meticulous preparation is paramount to a smooth and successful cannulation procedure. This involves gathering the necessary equipment, adhering to strict hygiene protocols, thoroughly assessing the patient’s veins, and effectively communicating the process to the patient.
Equipment Checklist: What Every Nurse Needs
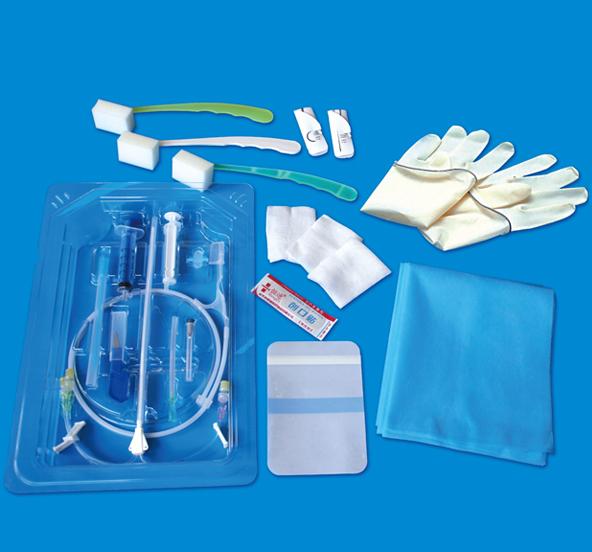
Before initiating the procedure, ensure all necessary supplies are readily available and within easy reach. A standard equipment checklist typically includes:
- Appropriate-sized IV cannula: Select the correct gauge and length based on the patient’s needs and vein size. Having a couple of sizes readily available is prudent in case the initial choice is not suitable.
- Tourniquet: To distend the veins and make them more prominent.
- Antiseptic solution: Typically chlorhexidine-alcohol or povidone-iodine to cleanse the insertion site.
- Sterile gauze pads: For cleaning and applying pressure.
- Transparent semi-permeable dressing: To secure the cannula and allow for site observation.
- Extension set (optional but often recommended): To provide distance between the insertion site and the IV fluid bag, reducing manipulation and potential dislodgement.
- Saline flush syringe: To assess catheter patency after insertion.
- Gloves: Non-sterile gloves for the procedure and sterile gloves if required by local policy or patient condition.
- Sharps container: For the safe disposal of the needle.
- Tape (optional): For additional securement if needed.
Hygiene and Infection Control Protocols
Maintaining asepsis throughout the cannulation process is critical to prevent healthcare-associated infections. Strict adherence to hygiene and infection control protocols is non-negotiable. This includes performing thorough hand hygiene (handwashing with soap and water or using alcohol-based hand rub) before and after the procedure, as well as before and after touching the insertion site or equipment. Non-sterile gloves should be worn during the insertion process. If the policy dictates or the patient is immunocompromised, sterile gloves may be required. The skin at the insertion site must be meticulously cleansed with an appropriate antiseptic solution using a back-and-forth or circular motion, allowing it to air dry completely before attempting insertion. The drying time makes the antiseptic to be effective in reducing the microbial load on the skin.
Patient Assessment: Identifying Suitable Veins and Sites
A thorough patient assessment is essential for identifying the most suitable vein for cannulation. This involves visual inspection and palpation of potential sites, typically starting distally (in the hand or lower forearm) and moving proximally if necessary. Consider factors such as the size and straightness of the vein, its turgor (fullness), and its stability (whether it rolls easily). Avoid areas over joints, areas of previous infiltration or phlebitis, and sites distal to a previous cannulation attempt in the same vein. In patients with a history of difficult venous access, techniques like applying warmth to the limb or having the patient make a fist can help to distend veins. Documenting the chosen site is important for future reference.
Communication Skills: Explaining the Procedure to Patients to Reduce Anxiety
Cannulation can be an anxiety-provoking experience for patients. Clear and empathetic communication can significantly reduce their apprehension and increase cooperation. Before commencing the procedure, explain what you are going to do, why it is necessary, and what the patient can expect to feel (e.g., a brief sharp scratch). Answer any questions the patient may have honestly and patiently. Maintaining a calm and reassuring demeanor can help build trust and facilitate a smoother procedure. For instance, saying something like, “Mr./Ms. [Patient’s Name], I’m going to insert a small, soft tube into your vein to give you your medication. You might feel a quick pinch, but it will be over quickly,” can help prepare the patient.
In summary, meticulous preparation encompassing equipment readiness, strict adherence to infection control, thorough patient assessment, and effective communication lays the foundation for a successful and patient-centered cannulation experience. These steps minimize the risk of complications and enhance the likelihood of a first-attempt success.

The Step-by-Step Cannulation Process: Mastering the Technique
The cannulation process requires a systematic and precise approach, integrating the knowledge gained in the preparatory stages with skillful execution. Each step is crucial for successful vein access and minimizing patient discomfort and complications.
- Preparing the Work Area and Equipment: Organize your supplies on a clean, flat surface within easy reach. Open the cannula packaging carefully, ensuring sterility is maintained. Pre-flush the extension set (if using) with sterile saline to remove air and prime the line. Ensure the sharps container is readily accessible for immediate disposal of the needle. This organized approach promotes efficiency and reduces the risk of contamination.
- Positioning the Patient for Comfort and Access: Position the patient comfortably, ensuring the chosen limb is well-supported and easily accessible. For arm veins, the arm should be extended and resting on a firm surface. Gravity can help distend veins; therefore, positioning the arm slightly below the level of the heart can be beneficial. Ensure adequate lighting to visualize the veins clearly. Proper positioning enhances visualization and stability, contributing to first-attempt success.
- Identifying and Selecting the Optimal Vein: Re-assess the previously identified vein. Apply the tourniquet 4-6 inches above the intended insertion site, tight enough to impede venous return but not arterial flow (a radial pulse should still be palpable). Encourage the patient to open and close their fist gently to further distend the veins. Palpate the vein to assess its depth, size, straightness, and resilience. A “bouncy” vein is often a good choice. Avoid veins that are sclerosed (hardened), tortuous (twisty), or located near areas of inflammation or injury.
- Skin Preparation and Antisepsis: Once the optimal vein is identified, cleanse the insertion site thoroughly with the chosen antiseptic solution. Apply the antiseptic in a back-and-forth scrubbing motion for at least 30 seconds or in a circular motion moving outward, covering a wide area (approximately 2-3 inches in diameter). Allow the antiseptic to air dry completely. Do not touch the cleansed area before attempting insertion, as this can recontaminate the site.
- Insertion Techniques and Tips for Success
- Stabilize the vein: Use your non-dominant thumb to gently pull the skin taut below the intended insertion site. This helps to anchor the vein and prevent it from rolling.
- Needle insertion: Hold the cannula with the bevel (the slanted opening of the needle) facing upwards. Insert the needle through the skin at a shallow angle (typically 10-30 degrees, depending on the vein’s depth).
- Observing for flashback: Advance the needle slowly until you see a “flashback” of blood in the flashback chamber of the cannula. This indicates that the needle has entered the vein.
- Advancing the catheter: Once flashback is observed, lower the angle of the needle almost parallel to the skin and advance it slightly further (approximately 1-2 millimeters) to ensure the catheter tip is also within the vein.
- Threading the catheter: Gently advance the catheter into the vein while simultaneously retracting the needle. Ensure the entire catheter is threaded into the vein. Never reinsert the needle into the catheter once it has been partially withdrawn, as this can shear off the catheter tip, leading to a serious complication.
- Removing the needle: Once the catheter is fully inserted, activate the safety mechanism on the needle (if present) and immediately dispose of it in a sharps container.
- Connecting the extension set or IV tubing: Carefully connect the pre-flushed extension set or IV tubing to the hub of the catheter.
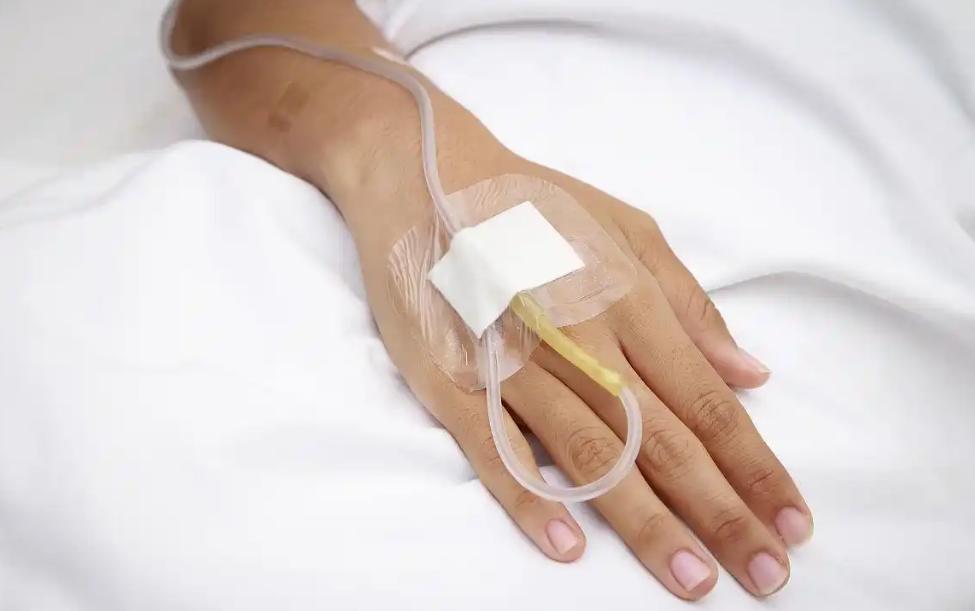
- Securing the Catheter and Dressing: Apply a stabilization device or tape according to your institution’s policy to prevent catheter movement and dislodgement. Apply a transparent semi-permeable dressing over the insertion site. This allows for continuous visualization of the site for signs of infection or infiltration. Ensure the dressing is applied securely to prevent it from peeling off.
- Documentation: Immediately after the procedure, meticulously document all relevant information in the patient’s chart. This includes the date and time of insertion, the gauge and length of the cannula, the insertion site, the number of attempts, the patient’s tolerance of the procedure, the type of dressing applied, and your initials. Accurate documentation is crucial for continuity of care and legal purposes.
Mastering the step-by-step cannulation process requires practice, patience, and attention to detail. By following these guidelines and consistently refining your technique, you will progress towards becoming a proficient and confident practitioner.

Advancing Your Skills: From Competence to Expertise
Achieving competence in cannulation is a significant milestone, but the journey towards expertise is ongoing. Continuous learning, observation, and adaptation are key to refining your skills and handling increasingly complex situations.
A. Importance of Continuous Practice and Observation: Like any psychomotor skill, proficiency in cannulation is enhanced through consistent practice. Every successful (and even unsuccessful) attempt provides valuable learning opportunities. Actively observe experienced colleagues performing cannulation, paying attention to their techniques, vein selection strategies, and troubleshooting approaches. Reflect on your own experiences, identifying areas for improvement. For instance, if you frequently encounter rolling veins, seek out techniques specifically designed to stabilize them. The more you practice and consciously observe, the more intuitive and skillful you will become.
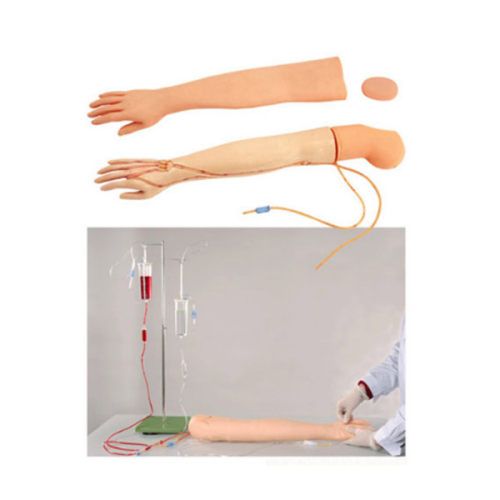
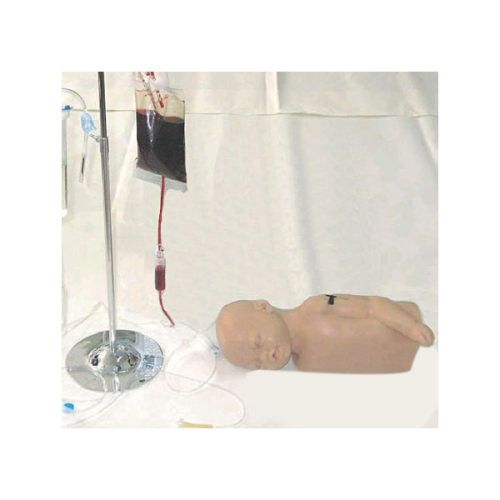
- Utilizing Simulation and Training Resources: Simulation labs and training mannequins offer a safe and controlled environment to practice cannulation techniques without the pressure of a real clinical situation. These resources allow you to repeatedly practice different scenarios, including challenging vein types and patient presentations. Many institutions also offer advanced cannulation workshops or online modules that provide further education on specialized techniques and complication management. Actively seeking out and utilizing these resources can significantly accelerate your skill development and build confidence.
C. Understanding Patient-Specific Considerations: Recognizing that each patient presents unique challenges is crucial for advancing your expertise. Factors such as age (pediatric vs. geriatric), body habitus (obese vs. cachectic), medical conditions (e.g., dehydration, chronic illness), and previous IV access history can significantly impact vein availability and quality. For example, cannulating a dehydrated elderly patient with fragile veins requires a gentler approach and potentially smaller gauge catheters. Understanding these patient-specific considerations and adapting your technique accordingly is a hallmark of an expert practitioner. Reviewing patient histories and collaborating with experienced colleagues on challenging cases can enhance your understanding of these nuances.
D. Mentorship and Peer Learning: Seeking guidance from experienced nurses who are skilled in cannulation can provide invaluable insights and personalized feedback. A mentor can offer practical tips, share their own experiences with difficult cases, and help you troubleshoot challenges you may encounter. Similarly, engaging in peer learning, discussing difficult cases with colleagues, and sharing best practices can broaden your knowledge and expose you to different approaches. Creating a supportive learning environment within your team fosters continuous improvement and shared expertise.
The journey from novice to expert in cannulation is a continuous process of learning, practicing, and refining your skills. From understanding the intricacies of venous anatomy to skillfully navigating challenging insertions, the development of expertise in this essential nursing skill directly translates to improved patient outcomes and enhanced professional confidence. As healthcare evolves and patient needs become increasingly complex, the commitment to lifelong learning and skill refinement remains paramount. By embracing opportunities for practice, utilizing available resources, understanding patient-specific considerations, and engaging in mentorship and peer learning, nurses can confidently navigate the path from novice to expert, ultimately providing safe, effective, and compassionate care, one successful IV insertion at a time.