
In fields like quality control, aerospace engineering, or any precise machine shop, measuring material hardness is essential. The Rockwell Hardness Test dominates because it’s quick, dependable, and shows a straightforward digital or dial reading—not so complicated like optical methods.
Still, accuracy depends on proper sample preparation and machine calibration. Get it wrong on those parts, and readings can be way off. So here’s what you need to know to use a Rockwell hardness tester correctly.
How Does a Rockwell Hardness Tester Work? Depth, Not Area
The Rockwell test measures hardness by calculating the net depth of indentation under a specific load, rather than the surface area of the dent.
The process happens in three quick phases:
- Minor Load (P0): A preliminary force (usually 10 kgf ) is applied to break through surface imperfections and set a baseline depth (h0).
- Major Load (P1): The main force is applied to drive the indenter deeper into the material.
- Total Load (P): The major load is removed, but the minor load remains. The material elastically recovers slightly, leaving a residual depth (h1).
The machine measures the net increase in depth (h = h1 – h0). The softer the material, the deeper the indent, and the lower the hardness score.
How to Use a Rockwell Hardness Tester?
This operational workflow and parameter matrix are strictly compiled based on the current ASTM E18 (American Society for Testing and Materials) and ISO 6508 (International Organization for Standardization) standards. This guide breaks down every critical step into an easy-to-follow process while maintaining absolute metallurgical rigor.
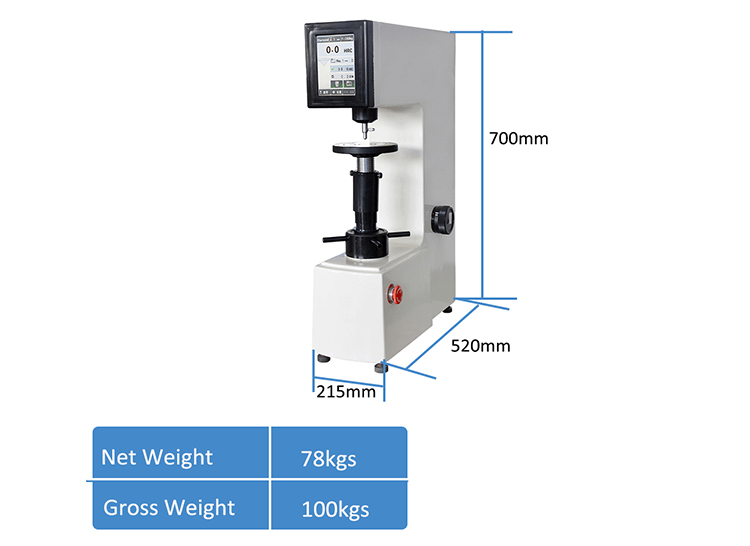
560RSS Digital Double Rockwell Hardness Tester 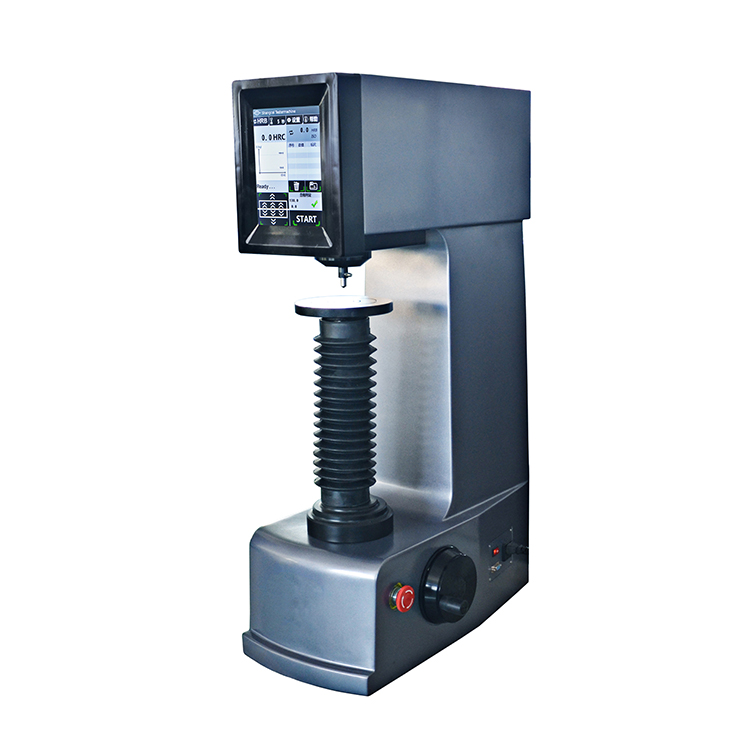
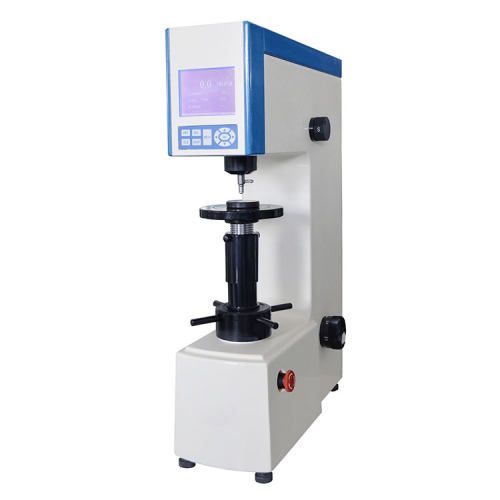
560RSSZ Automatic Rockwell Hardness Tester 
HRS-150 Digital Rockwell Hardness Tester
Step 1: Select the Correct Rockwell Scale, Indenter, and Load
In Rockwell hardness testing, you must precisely match the indenter type, minor load, and total major load to the material’s expected hardness and thickness. Standard Rockwell testing utilizes a fixed minor load of 10 kgf, while the total major load varies depending on the scale:
| Scale | Indenter Type | Total Major Load | Dial Color | Typical Materials & Applications |
| HRA | 120°Diamond Cone | 60 kgf | Black | Hard carbide alloys, thin hard steel sheets, case-hardened layers. |
| HRB | 1/16″ Tungsten Carbide Ball | 100 kgf | Red | Copper alloys, soft steels, aluminum alloys, malleable iron. |
| HRC | 120°Diamond Cone | 150 kgf | Black | Hardened steels, tempered parts, titanium, deep case-hardened surfaces. |
| HRD | 120° Diamond Cone | 100 kgf | Black | Case-hardened steel, thin steel sections (where HRC is too heavy). |
| HRE | 1/8″ Tungsten Carbide Ball | 100 kgf | Red | Cast iron, aluminum plastics, bearing metals. |
| HRF | 1/16″ Tungsten Carbide Ball | 60 kgf | Red | Annealed copper alloys, thin soft metal sheets. |
| HRG | 1/16″ Tungsten Carbide Ball | 150 kgf | Red | Phosphor bronze, beryllium copper, structural steels. |
Core Metallurgical Rule (Diamond vs. Ball)
- If the material’s hardness is higher than 200 HB (e.g., quenched tool steel), you must select a diamond cone indenter (A, C, or D scale).
- If the material is softer, you must use a tungsten carbide ball indenter (B, E, F, etc.) to prevent crushing the diamond or causing measurement errors.
Note: Modern international standards strictly mandate the use of Tungsten Carbide Balls to replace older, traditional steel balls, eliminating micro-deformation of the ball itself.
Why Harder = Higher
A Rockwell hardness tester is essentially a micro-precision depth gauge. It does not measure the surface area of the dent; instead, it measures the net residual depth indentation (h = h1 – h0) before and after the major load is applied.
To align with the intuition that “harder materials should have higher numbers,” standard formulas use an inverted “subtraction” design. Every single Rockwell unit (1 HR) is strictly equivalent to 0.002mm (2um) of indentation depth:
- Diamond Indenter Scales (A, C, D): The system starts at a “perfect score” of 100, and subtracts points based on depth:
HRC = 100 – h/0.002
- Tungsten Carbide Ball Scales (B, E, F, G): Because soft metals are indented much deeper, the baseline starts at 130 to prevent negative values:
HRB = 130 – h/0.002
The “Black vs. Red” Dial Mystery
If you are using an analog tester, you will see two sets of numbers. This mathematical formula explains why:
- Black Scale: Aligns its “0” with the top “SET” position. Use this for Diamond tests (HRA, HRC).
- Red Scale: Offsets its “0” to line up with the black “30” (because 130 – 100 = 30). Use this for Ball tests (HRB).
Step 2: Sample Preparation
- The testing surface and the back of the specimen must be flat, parallel, completely polished or ground clean, and entirely free of oxide scale, metal burrs, and oil.
- Thickness Check: The specimen thickness must be $\ge 10$ times the residual indentation depth. If any visible deformation or bulge appears on the underside after testing, the data is invalid.
- Choose an anvil that matches your part’s geometry (e.g., cylindrical parts must use a V-anvil with the centerline perfectly centered).
Step 3: Daily Verification (Calibration)
- Before formal testing, you must verify the machine using a certified standard hardness block with a value close to your expected target range.
- Perform 3 consecutive indents. You must discard the 1st reading (as it is used purely to eliminate microscopic mechanical clearances between the indenter, spindle, and elevating screw). The average of the next two points must fall within the block’s tolerance.
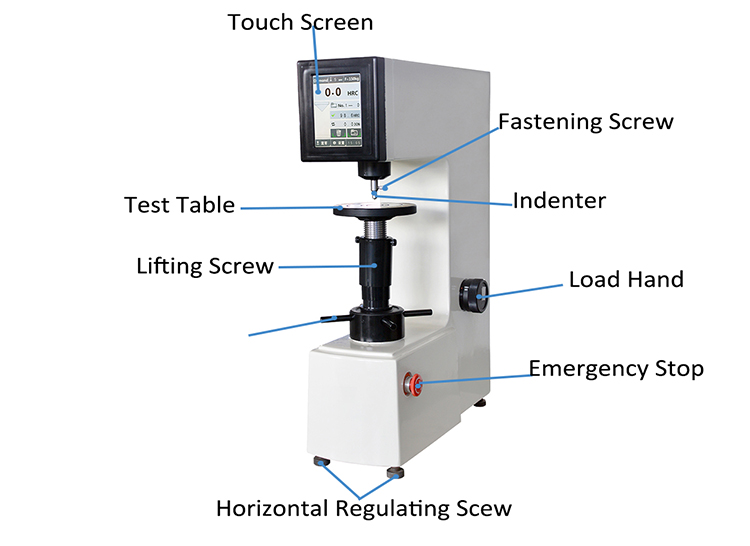
Step 4: Mounting and Applying the Minor Load(10kgf)
- Secure the specimen on the anvil. Slowly rotate the elevating screw handwheel clockwise to bring the specimen into contact with the indenter.
- For Digital Models: Watch the on-screen progress bar or wait for the buzzer signal. Fine-tune until the screen indicates the minor load is fully reached (10kgf).
- For analog machines, reset your main dial bezel so the large needle sits exactly on the “0” / “SET” mark.
Step 5: Applying the Major Load
- Trigger the automatic cycle button (digital) or smoothly pull down/push back the loading lever (manual) to apply the major load.
- Once fully loaded, maintain the force for a fixed Dwell Time (typically 2~ 6 seconds depending on material specifications).
- ·After the dwell time, the machine will automatically release the major load (digital), or you must smoothly return the lever to its original position (manual). Warning: Do not lower the anvil yet! The minor load must remain applied.
Step 6: Read and Record
- Read the hardness value directly from the digital screen or the correct scale color on the analog dial (Black for diamond, Red for carbide ball).
- Enforce the Edge and Spacing Rule: The distance between the centers of two adjacent indentations, as well as the distance from any indentation center to the edge of the specimen, must be 3≥mm (or at least 3 times the indentation diameter). This prevents the strain-hardened zone of a previous test from skewing new results. Take 3 to 5 points across the specimen and average them.
Eg Average Hardness: HRC 61.8
| Test Point | Hardness |
| 1 | HRC 61.5 |
| 2 | HRC 62.0 |
| 3 | HRC 61.8 |
Tips, Tricks, and Common Pitfalls to Avoid
- The Edge Effect: Never test too close to the edge of your sample. Keep your indentation at least 3 times the diameter of the indent (or $\ge 3\text{ mm}$) away from any edge.
- Spacing Indents: Don’t punch right next to an old dent. The previous test works hardens the surrounding metal. Space your tests at least 3 indent diameters apart.
- Watch for “Anvil Marks”: If you look at the underside of your sample after a test and see a bump or mark, your material is too thin for that specific Rockwell scale. Switch to a lighter scale (like a Superficial Rockwell scale, which drops the minor load to 3 kgf).

