
The Brinell hardness test is one of the most widely used methods for measuring metal hardness, making it particularly ideal for materials with coarse or uneven grain structures, such as castings, forgings, structural steel, and aluminum alloys. Primarily used to determine the Brinell hardness (HBW) of cast iron, steel, non-ferrous metals, and various alloys, the Brinell tester has become the go-to equipment for both incoming raw material inspections and finished product quality control—thanks to its high precision, repeatable data, and exceptional material versatility.
What is the Brinell Hardness Test?
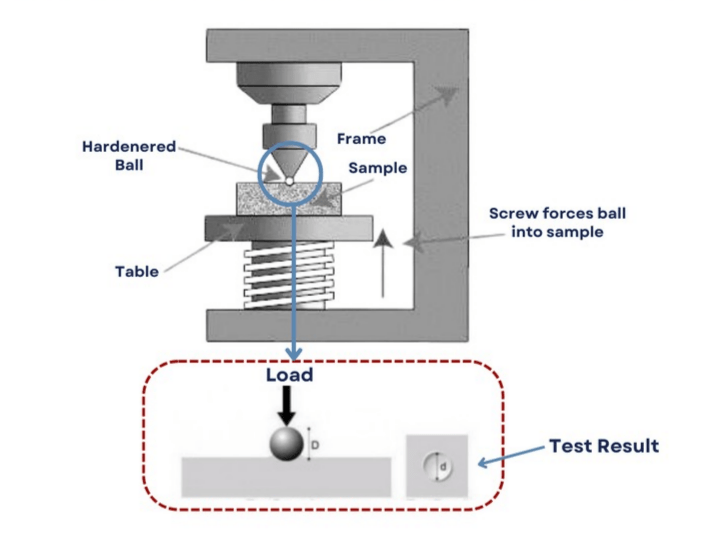
The Brinell test works by applying a weight to a material using a hard steel ball.
The size of the dent left is then used to determine the hardness of the substance, given in units HBW, which stands for Hardness Brinell Wolfram [tungsten].
The smaller and deeper the dent, the harder the material.
How to Use a Brinell Hardness Tester?
By following these steps, you will ensure your material testing is compliant with international standards like ASTM International ASTM E10 or International Organization for Standardization ISO 6506
Step 1:The indispensable preparatory work before the test
First Off: Prepare the Sample Material
Before anything else, prepare your test material prior to conducting the test.
- Surface smoothness – The surface of the test material must be ground or polished. If not, you would not be able to accurately see the indentation formed when placed under the microscope.
- Thickness – The material should have sufficient thickness such that the indentation will not be seen from the other side. One standard practice is to have the material’s thickness be eight times the depth of the indentation formed.
- Stability – Make sure the test material is level and firmly fixed on the tester’s anvil.
Next: Pre-Operation Inspection
Before operating the machine, make sure that the machine is in level equilibrium without any sort of wobbling. Make sure that the indenter is in excellent condition; i.e., that it has a perfectly spherical ball made up of tungsten carbide without any scratches or deformations. Make sure that the anvil is free from dirt or grease and that the elevating screw operates smoothly.
After doing the visual check-up, plug in the machine and switch it on. Allow it to run for a period of 3 to 5 minutes.
Step 2: Choose the Right Ball and Load
You cannot just pick random parameters; you must select a specific combination of ball diameter (D) and test load (F) based on the material’s thickness and type. The goal is to maintain a constant force-to-diameter ratio (F/D2) so that results are consistent across different scales.as mandated by ISO 6506-1.
1. Select the Force-to-Diameter Ratio (F/D2) based on material
- Ratio 30: For ferrous metals, steel, and cast iron (Hardness≥140 HBW).
- Ratio 10: For copper alloys and aluminum alloys (Hardness 35~ 200HBW).
- Ratio 5: For pure copper, pure aluminum, and soft lead/tin alloys.
2. Select the Ball Diameter (D) based on material thickness
- 10 mm Ball: For material thicknesses≥6 mm (Most common for heavy-duty testing).
- 5 mm Ball: For material thicknesses between 3 ~6 mm.
- 2.5 mm or 1 mm Ball: For thin sheets under 3 mm.
3. Calculate the Required Load (F)
Once you have your ratio and ball size, use the standard formula to find your exact load in kilogram-force (kgf):
F = Ratio×D2
Example: For a 4 mm thick aluminum plate, you need a ratio of 10 and a 5 mm ball. Your load will be 10×52 = 250 kgf
Standard Brinell Combination Quick-Reference Table
| Material Type | Force-to-Diameter Ratio (F/D2) | Ball Diameter D (mm) | Standard Load F (kgf) | Test Designation |
| Steel, Cast Iron, Ferrous Metals | 30 | 10 | 3000 | HBW 10/3000 |
| 5 | 750 | HBW 5/750 | ||
| 2.5 | 187.5 | HBW 2.5/187.5 | ||
| Brass, Bronze, Hard Aluminum | 10 | 10 | 1000 | HBW 10/1000 |
| 5 | 250 | HBW 5/250 | ||
| 2.5 | 62.5 | HBW 2.5/62.5 | ||
| Pure Aluminum, Pure Copper | 5 | 10 | 500 | HBW 10/500 |
| 5 | 125 | HBW 5/125 |
Step 3: Perform the Test
Once the machine is configured with the correct indenter and weights, follow these operational steps:
- Place the specimen firmly on the anvil.
- Raise the anvil slowly using the handwheel until the specimen makes light contact with the indenter.
- Apply the force. On modern digital machines, this is as simple as pressing “Start.” The machine will automatically apply the full test load smoothly.
- Dwell Time: Hold the load in place. The standard dwell time is 10 to 15 seconds for steel, but can be up to 30 seconds or more for softer metals.
- Release the force smoothly.
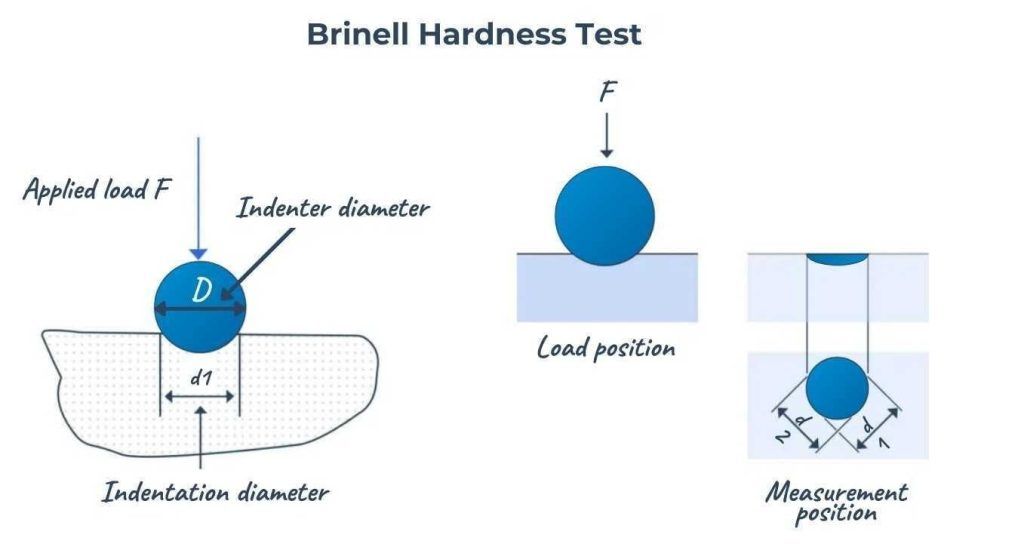
Step 4: Measure the Indentation
This is where precision matters most. You are not measuring the depth of the dent; you are measuring its width.
- Use the tester’s built-in optical microscope (or a portable Brinell scope) to examine the indentation closely.
- Measure the diameter of the indentation in two perpendicular directions (d1 and d2).
- Calculate the average diameter:
d =(d1 + d2)/ 2
Step 5: Calculate the Brinell Hardness Number (HBW)
- If you are using a modern digital tester, the machine will calculate this for you instantly after you input the measured diameter. However,
- if you are doing it manually, you will use the standard Brinell formula:
HBW = 2F ÷ [πD(D − √(D² − d²))]
- F = Applied load (in kgf)
- D = Diameter of the indenter ball (in mm)
- d = Average diameter of the impression (in mm)
Alternatively, most workshops use a pre-calculated Brinell Conversion Table to match the measured diameter ($d$) straight to the HBW value.
Key operational precautions
| Action | Why it Matters |
| Keep spacing in mind | Keep the center of any indentation at least 2.5 times the indentation diameter away from the edge of the specimen, and at least 3 times the diameter away from another dent. |
| Check the indenter | Ensure the tungsten carbide ball is clean and free of deformities or flat spots. |
| Avoid vibration | Ensure the tester is on a stable, vibration-free bench, as shaking can cause false, overly large indents. |
References & International Standards
- ISO 6506-1: Metallic materials — Brinell hardness test — Part 1: Test method. International Organization for Standardization. Available from the ISO Official Standards Catalog.
- ISO 6506-2: Metallic materials — Brinell hardness test — Part 2: Verification and calibration of testing machines. International Organization for Standardization. Available from the ISO Official Standards Catalog.

