
To automate the metallographic polishing process, the most direct and effective solution is to adopt a commercial Fully Automatic Metallographic Polisher. Achieving true automation relies on locking down the four critical parameters that govern sample quality—force, speed, time, and lubricant/slurry dosing.
Using a Fully Automatic Metallographic Polisher: The Most Efficient & Direct Approach
To automate the metallographic polishing process, the most convenient approach is to upgrade the equipment—converting manual or semi-automatic polishing machines into automatic grinding-and-polishing systems. This is because automated metallographic sample preparation typically involves an automatic force/feed system, an automatic dosing system, and a programmable control panel or software. Retrofitting a semi-automatic machine yourself not only requires additional budget for these components but also demands significant time and effort to DIY the equipment.
However, currently available “fully automatic metallographic polishing machines” primarily focus on quality standardization rather than complete unmanned operation. They eliminate human dependency during the polishing cycle itself, but they still require manual intervention for:
- Manual loading, mounting, and clamping of specimens
- Washing and drying specimens between preparation steps
- Changing abrasive papers and polishing cloths
To achieve complete, hands-free automation (“sample in, polished specimen out”), a Robotic Metallographic Workstation is required. These systems integrate industrial robotic arms, multi-disc carousels, automated high-pressure rinsing, and ultrasonic drying modules. However, such stations are bulky, extremely expensive (often several times the cost of standard automatic machines), and have higher maintenance requirements and failure risks. They are typically practical only for high-throughput operations like large steel mills or central testing facilities processing hundreds or thousands of identical specimens daily.
Semi-Automatic Metallographic Polishing DIY / Modular Retrofit: Step-by-Step
For laboratories with limited budgets, retrofitting a modular pneumatic head and an external peristaltic dosing pump onto an existing semi-automatic base solves 80% of pressure and slurry inconsistency issues. Automation relies on automating three core mechanical functions. Although designing, selecting components, and building the system requires significant effort, it is the lowest-cost shortcut to eliminating operator variability.
Required DIY Hardware & Component Selection
| Module | Core Component Selection | Function & Installation |
| Pneumatic Loading Module | Miniature double-acting pneumatic cylinder + pressure regulator (or proportional valve) | Replaces manual screw or spring pressure to supply constant force. Installed on the main column above the polishing head. |
| Automatic Dosing Module | 24V peristaltic pump (or solenoid pulse spray valve) + silicone tubing | Replaces manual slurry spraying. The intake tube goes into the slurry bottle, and the discharge nozzle is fixed above the disc. |
| Main Control Module | Basic PLC (or Arduino / time-delay relay board) + 7-inch touchscreen | Acts as the brain, controlling cylinder movement, peristaltic pump dosing intervals, and polishing timers. |
| 4. Measurement Auxiliary (Optional) | 0–24V Linear Variable Differential Transformer (LVDT) | Attached to the side of the polishing head to measure grinding depth for targeted material removal. |
Retrofitting Procedure (Step-by-Step)
The core idea for DIY retrofitting a semi-automatic machine is straightforward: retain the existing motor and rotating platen, and add three external modules—pneumatic force application, pulsed automatic dosing, and a basic PLC controller—to lock down the four critical variables affecting polishing quality: force, speed, time, and lubricant/slurry volume.
1. Retrofitting the Pneumatic Power Head (Locking Down Force)
Remove Stock Hardware: Disassemble the manual clamping screw or spring-latch mechanism from the top of the semi-automatic head.
Mount the Cylinder: Fabricate a simple aluminum or steel mounting bracket directly above the head. Install the pneumatic cylinder vertically downward, and connect the cylinder rod to the specimen holder via a floating coupling (to absorb eccentricity and prevent head wobble).
Connect the Pneumatic Circuit: Set up the line: (Air Supply — Pressure Regulator — 5/2 Way Solenoid Valve — Cylinder). Adjust the regulator to set the required downward force (e.g., 15N for single-point loading).
2. Installing the Automatic Dosing Pump (Preventing Dry Polishing and Waste)
Mount the Peristaltic Pump: Secure a 24V miniature peristaltic pump to the machine housing.
Route Tubing: Insert the intake tube into the diamond suspension/lubricant bottle. Fix the outlet tube above the disc using an adjustable flexible arm, placing the drip point at the mid-radius of the polishing disc (centrifugal force will spread the slurry across the cloth).
Wiring: Connect the pump power leads to the relay output of the control board.
3. Integrating the Control Board & Logic (Locking Down Timing & Sequence)
Program a basic control sequence into the PLC or control board:
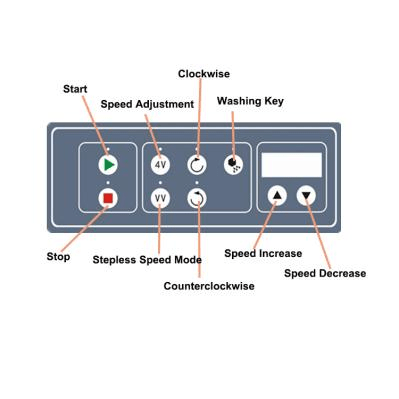
Upon pressing [START]:
- Platen motor starts (set to target RPM, e.g., 200 RPM).
- Solenoid valve energizes — Cylinder extends, bringing specimens into contact with the cloth.
- Peristaltic pump begins pulsed dosing (e.g., runs for 1 second every 10 seconds to dispense 2 drops of slurry).
- Timer countdown starts (e.g., 180 seconds for coarse polishing).
Upon timer completion:
- Cylinder automatically retracts, raising specimens off the cloth.
- Peristaltic pump stops dosing.
- Platen motor stops, and an audible signal sounds.
Standard Operating Procedure (SOP) Post-Retrofit
Once retrofitted, operators follow a simple 4-step workflow:
Clamp Specimen — One-Touch Start — Manual Rinse — Manual Disc Change
DIY Retrofit Troubleshooting & Tips
Floating Coupling is Mandatory: Do not rigidly connect the cylinder piston rod to the specimen holder. High-speed disc rotation introduces micro-vibrations and runout; a floating coupling absorbs this alignment error to prevent specimen edge rounding.
Preventing Dry Polishing & Backflow: Install a micro check-valve near the outlet of the peristaltic tubing. This prevents suspension from draining back into the bottle when the pump stops, avoiding dry polishing during the first few seconds of a new cycle.
Inter-Step Cleaning Cannot Be Skipped: Although DIY automation controls force, speed, time, and dosing, a 10-second manual water rinse and air blow-dry between steps remains essential. Skipping this allows coarse abrasive particles to contaminate fine polishing cloths, ruining the specimen mount.
This DIY approach requires minimal financial investment (primarily for the cylinder, peristaltic pump, and control board) while standardizing parameters that previously relied on operator experience. It elevates a semi-automatic unit to match the polishing quality of commercial fully automatic systems.